Robotic End Effector Types: The Essential Guide for Optimizing Your CNC Machining Automation
Introduction: The Business End of Robotic Precision
In the high-stakes world of CNC machining, where micron-level tolerances and relentless throughput define success, the robotic arm is often celebrated as the hero of automation. However, its true capability is unleashed only through its final, critical interface: the robotic end effector. This component, also known as End-of-Arm Tooling (EOAT), is where the robot’s programmed intelligence meets the physical task. It is the ultimate determinant of a system’s flexibility, precision, and reliability. For precision manufacturers like JLYPT, selecting the optimal robotic end effector type is not a secondary consideration—it is a fundamental engineering decision that directly impacts scrap rates, cycle times, and overall equipment effectiveness (OEE).
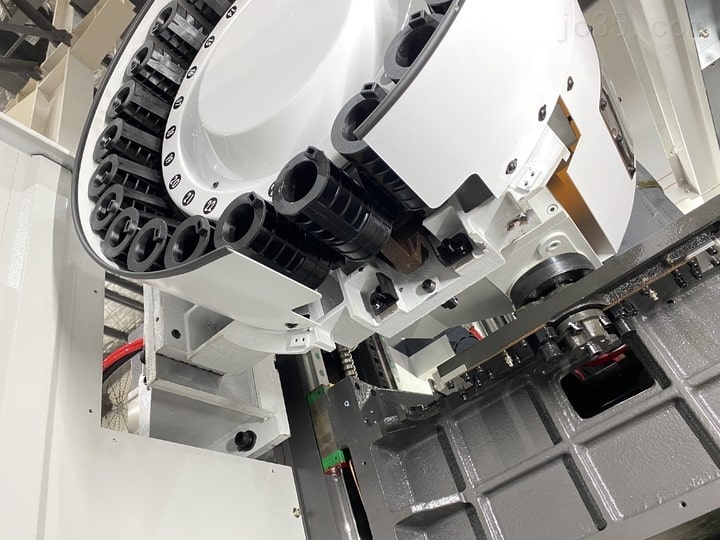
An end effector is any device attached to the robot’s wrist flange designed to interact with the environment. In CNC machining, this interaction ranges from the seemingly simple—grasping a raw aluminum billet—to the highly complex—performing an adaptive deburring operation on a contoured aerospace component. The choice of effector dictates what the robotic cell can achieve. A poorly matched end effector can become the weakest link, introducing errors, causing downtime, and bottlenecking an otherwise capable system. This comprehensive guide will dissect the major categories of robotic end effector types, provide a framework for selection based on CNC-specific applications, and explore the advanced technologies transforming this critical field.
Part 1: Understanding End Effector Fundamentals and Classifications
Before diving into specific types, it is crucial to understand the core principles that govern end effector functionality. All end effectors enable the robot to perform work, but they do so through two fundamentally different modes of interaction: prehensile and nonprehensile.
Prehensile Movements involve grasping and holding an object, much like a human hand uses the thumb. This includes grips like the palmar grip (enclosing an object), cylindrical grip (for holding tubes), and spherical grip (for balls). In robotics, prehensile movements are the domain of grippers.
Nonprehensile Movements manipulate an object without a traditional enveloping grasp. Actions like pushing, poking, or hooking fall into this category. In manufacturing, most tools—such as welding torches, spray guns, spindles, and deburring tools—perform nonprehensile operations.
This primary distinction leads us to the two major classifications of end effectors: Grippers and Tools.
1.1 Grippers: The Workpiece Handlers
Grippers are designed to securely acquire, hold, and release workpieces. Their design is paramount for tasks like machine tending, palletizing, and assembly. The key types include:
-
Mechanical Finger Grippers: The most common type, they use two, three, or four actuated fingers to close upon a workpiece. They can be parallel (fingers move linearly toward each other) or angular (fingers pivot). Their versatility makes them suitable for a wide range of part geometries, provided the part has accessible, parallel surfaces for grasping.
-
Vacuum Grippers: These employ suction cups connected to a vacuum generator. They are ideal for handling non-porous, flat, or sheet-like materials such as metal plates, glass, or finished machined surfaces where mechanical gripping might cause damage. Their simplicity and ability to handle large, thin objects are major advantages.
-
Magnetic Grippers: Used exclusively for ferrous materials, these use electromagnetic or permanent magnets to provide a powerful holding force with no moving parts, perfect for handling steel sheets or castings.
1.2 Tools: The Task Executors
When the task is to modify a workpiece rather than move it, a tool is mounted as the end effector. These transform the robot into a programmable machine tool. Common examples in CNC environments include:
-
Spindles & Cutting Tools: A motorized spindle turns the robot into a flexible milling or drilling machine, essential for large-part machining or trimming.
-
Deburring & Grinding Tools: These are used for finishing operations. Modern versions often incorporate force control to maintain consistent pressure against a variable surface.
-
Welding & Dispensing Tools: Including MIG/TIG torches, spot welders, and adhesive applicators for assembly or repair work.
Table 1: Core Robotic End Effector Types for CNC Machining Applications
| Type | Sub-Type | Operating Principle | Key Advantages | Typical CNC Application |
|---|---|---|---|---|
| Gripper | Mechanical (Parallel Jaw) | Actuated fingers close linearly on part features. | High grip force, precise positioning, versatile. | Tending lathes, loading vises, handling raw billets. |
| Gripper | Mechanical (Angular Jaw) | Fingers pivot to close, often conforming to shape. | Good for cylindrical parts, can provide enveloping grasp. | Handling round stock, gripping from outside of a rim. |
| Gripper | Vacuum | Suction cups create negative pressure adhesion. | Gentle handling, large surface area, fast cycling. | Loading/unloading sheet metal, handling finished/machined surfaces. |
| Gripper | Magnetic | Electromagnetic force holds ferrous materials. | Extremely high force, no moving parts, handles oily parts. | Moving steel plates, handling cast iron components. |
| Tool | Motorized Spindle | Electric spindle rotates cutting tool (end mill, drill). | Enables robotic milling, drilling, and tapping. | Trimming composites, machining large molds, hole patterns. |
| Tool | Force-Controlled Grinder | Actuated tool with compliance & force feedback. | Adapts to part variance, ensures consistent finish. | Deburring, polishing, chamfering edges. |
| Tool | Tool Changer | Interface allowing robot to swap multiple end effectors. | Maximum flexibility for multi-process cells. | Cells requiring both part handling and direct machining. |
Part 2: The Strategic Selection Process: Matching Effector to Application
Choosing the correct robotic end effector type requires a systematic analysis of the workpiece, the process, and the robot itself. This decision matrix is critical for achieving a robust and efficient cell.
2.1 Analyzing Workpiece Characteristics
The part is the primary design constraint.
-
Geometry & Features: Does the part have parallel faces for a mechanical grip, a large flat surface for vacuum, or is it ferrous for magnetic? Internal features might require a collet or expansion gripper.
-
Material & Surface Finish: Delicate, polished, or soft materials (e.g., aluminum, plastics) may rule out aggressive mechanical grippers in favor of vacuum or soft-jaw designs. Oily or dirty surfaces can compromise vacuum seal integrity.
-
Weight & Center of Gravity: The end effector must generate sufficient grip force to handle the part’s weight with a significant safety factor, considering inertial forces during acceleration. The grip must also be positioned to avoid creating a large moment arm that could overload the robot’s wrist.
2.2 Defining Process Requirements
The task dictates the necessary capabilities.
-
Cycle Time: High-speed processes need fast-acting grippers (pneumatic often excel here) and lightweight tooling to minimize robot inertia.
-
Accuracy & Repeatability: Precision assembly or machining demands end effectors with minimal deflection under load and high encoder resolution for tool positioning. Thermal expansion of the effector must also be considered for long-duration, high-precision tasks.
-
Environmental Conditions: Exposure to coolant, metal chips, high temperatures, or explosive atmospheres will dictate material choices (e.g., stainless steel), protection ratings (IP67), and potentially rule out certain technologies like electromagnetics in wet environments.
2.3 Ensuring Robot Compatibility
The end effector must be a matched partner to the robot.
-
Payload Capacity: The combined weight of the effector, tool, and workpiece must not exceed the robot’s payload rating, with margin for dynamic forces. A good payload-to-weight ratio for the effector itself is desirable.
-
Interface & Connectivity: The effector must physically and electronically connect to the robot’s wrist flange. This includes mechanical mounting (ISO or proprietary flange), and providing necessary utilities (air for pneumatic grippers, power for motors, and communication for sensors).
-
Tool Center Point (TCP) Definition: The location of the TCP—the control point of the tool—must be precisely known and stable. Complex or adjustable effectors need robust TCP calibration procedures.
Part 3: Advanced Capabilities and Modern Trends in EOAT Design
The frontier of robotic end effector type technology is driven by the need for greater flexibility, intelligence, and ease of use, particularly for high-mix, low-volume production.
3.1 The Rise of Electric and Adaptive Tooling
A significant shift is occurring from purely pneumatic to electric actuation. Electric grippers and tools offer programmable control over speed, force, and position, enabling one tool to handle a wider range of parts through software settings rather than mechanical changeovers. This is especially valuable for smaller shops that frequently switch jobs.
Furthermore, adaptive tooling is simplifying complex applications. For example, axially compliant grinding tools use internal pneumatic pistons to maintain constant force against a surface, automatically accommodating part variations without the need for expensive vision systems or complex programming. This provides a simpler, more cost-effective path to automation for finishing operations.
3.2 Sensor Integration and Intelligent Effectors
Intelligence is moving to the edge—the end of the arm. Modern EOAT increasingly integrates sensors that provide real-time feedback, closing the control loop.
-
Force/Torque Sensors: Mounted at the wrist, these allow for compliant motion control, enabling precise assembly, delicate part placement, and adaptive machining where the robot “feels” its way.
-
Vision Systems: Eye-in-hand configurations, where a camera is mounted directly on the effector, provide unparalleled visual guidance for precise pick-and-place of randomly oriented parts or for in-process inspection.
-
Part Presence & Tactile Sensing: Sensors in gripper fingers confirm a successful grip before moving, preventing costly crashes or dropped parts—a critical feature for lights-out manufacturing.
3.3 Quick-Change Systems and Hybrid Designs
For maximum flexibility, automatic tool changers allow a single robot to perform multiple tasks by swapping different grippers and tools on the fly. This transforms a robot from a dedicated machine tender into a multi-skilled manufacturing cell operator.
Hybrid effectors that combine multiple functions in one unit are also emerging. A single end effector might integrate a mechanical gripper, a vacuum pad, and a vision camera, allowing it to handle a vast array of part types without a tool change.
Part 4: In-Depth Case Studies in CNC Machining
Case Study 1: High-Mix Precision Hydraulic Manifold Production
-
Challenge: Tomenson Machine Works, a manufacturer of precision hydraulic manifolds, faced challenges with frequent job changeovers. Their wide range of parts, requiring pin stamping and engraving, made dedicated automation seem impractical due to the time needed for tooling adjustments.
-
Solution & End Effector Choice: The company deployed a collaborative robot (cobot) equipped with an electric adaptive gripper (OnRobot RG6). The key advantage was software-based adaptability. Instead of physically changing gripper jaws for each different manifold size and shape, technicians simply selected the new part program. The electric gripper’s stroke and force were automatically reconfigured via software.
-
Outcome: Changeover time between jobs was reduced to near zero. This allowed the shop to profitably bid on smaller batch jobs that were previously uneconomical. The success paved the way for plans to expand automation into machine tending and deburring, using the same flexible handling principle.
Case Study 2: Robotic Deburring of Complex Automotive Castings
-
Challenge: A Tier 1 automotive supplier needed to deburr complex aluminum transmission housings. Manual deburring was inconsistent and labor-intensive, while traditional robotic grinding required expensive, custom-engineered tool paths and vision systems to account for casting variance, leading to a poor ROI.
-
Solution & End Effector Choice: The solution was a force-controlled, axially compliant grinding tool (ATI CGV-900). This specialized end effector uses internal pneumatic compliance to apply a constant force to the workpiece. As the robot moves along a programmed path, the tool automatically adjusts its extension to follow the part’s true surface, compensating for geometric tolerances and tool wear without external sensing.
-
Outcome: The system achieved a consistent finish quality across all parts at a fraction of the cost and complexity of a vision-guided system. The simplified solution provided a rapid return on investment, making automation viable for their high-mix environment, and was notably lighter and easier for the robot to manipulate than traditional grinding tools.
Case Study 3: Flexible Machining of Large Aerospace Components
-
Challenge: An aerospace manufacturer needed to perform finish milling and drilling on large, curved composite panels. The size and low volume of parts made dedicated CNC gantries cost-prohibitive. Using a standard robot arm for machining was limited by its lack of stiffness, leading to chatter and poor surface finish.
-
Solution & End Effector Choice: The integrator designed a custom high-stiffness, motorized spindle end effector with integrated force feedback. The effector’s structure was optimized using Finite Element Analysis (FEA) to maximize rigidity. A force/torque sensor at the wrist provided data for advanced hybrid position/force control, allowing the system to make micro-adjustments to the cutting path based on real-time feedback, compensating for robot deflection and material variability.
-
Outcome: The intelligent end effector enabled the robot to perform precision machining operations that met aerospace tolerances. This flexible cell could be quickly reprogrammed for different large parts, providing an economical alternative to massive fixed machinery and demonstrating how advanced effector design can overcome the inherent limitations of serial-link robots.
Part 5: Practical Guide to Implementation and Best Practices
Successfully implementing a new end effector goes beyond the purchase order. Follow this phased approach:
Phase 1: Proof of Concept & Virtual Design
Never skip simulation. Use CAD/CAM software and robotic simulation platforms to create a full digital twin of the effector and workpiece. Verify reach, check for collisions, and analyze cycle times virtually. This stage can reveal fatal flaws before any metal is cut.
Phase 2: Prototyping & Testing
For custom designs, leverage modern methods like 3D printing to create fast, inexpensive prototypes for form and fit testing. Topology optimization software can then be used to design a final version that is both strong and lightweight, minimizing the effector’s weight to preserve robot payload.
Phase 3: Integration & Safety Validation
Physical integration involves precise mechanical mounting and connection of all services (air, power, data). Calibration of the Tool Center Point (TCP) is critical for accuracy. Most importantly, the complete system, including the end effector, must undergo a risk assessment per the latest safety standards (e.g., ISO 10218:2025, which now includes specific guidance for end-effectors). Ensure all necessary safeguards, like pressure-sensing grippers that halt the robot if a part is dropped, are functional.
Phase 4: Documentation & Training
Create detailed documentation, including maintenance schedules for wear items like gripper jaws or suction cups. Train operators and maintenance technicians on how to change tooling, calibrate sensors, and perform basic troubleshooting.
Conclusion: The Critical Link in Your Automated Value Chain
The selection and engineering of the robotic end effector type is where theoretical automation meets practical manufacturing reality. It is a discipline that blends mechanical design, materials science, controls engineering, and a deep understanding of the machining process. As the field advances with smarter, more adaptive, and electrically controlled tools, the potential for robots to take on more delicate, varied, and precise tasks in the CNC workshop grows exponentially.
For manufacturers, the message is clear: investing time and expertise in choosing the right end effector is not an option; it is a prerequisite for automation success. The most sophisticated robot is only as capable as the tool at its wrist. By methodically analyzing your application, understanding the expanding technology landscape, and following a rigorous implementation process, you can ensure this critical link in your automated cell is a source of strength, precision, and competitive advantage.
At JLYPT, we understand that precision machining and precision automation are two sides of the same coin. Our expertise encompasses not only the creation of精密零件 but also the design and integration of the intelligent systems that produce them. We recognize that the journey to a fully optimized, lights-out manufacturing cell begins with the perfect grip, the right tool, and a partner who understands the details.
Ready to optimize the “business end” of your robotic automation? Explore how JLYPT’s integrated approach to precision manufacturing and automation integration can help you select, design, and deploy the ideal robotic end effector solution for your most challenging applications. Visit our service page to begin the conversation: JLYPT CNC Machining Services